GitHub for documentation sites
](/images/learn/github-logo400x200.png)
Learning GitHub or any source control system backed by git for documentation sites takes some time and practice. This set of lessons uses the Terminal rather than the desktop application or the web site UI, though both are valid ways to do a Git workflow.
Prerequisites
- A GitHub, GitLab, or other Git online account.
- A Git repository already created online in one of those services (GitHub, GitLab, or similar).
These instructions are written for both Windows and MacOS or Linux-based environment.
Create a GitHub account or GitLab account
You can learn how to sign up for a GitHub account and pricing plans on help.github.com.
For GitLab registration and pricing, refer to the GitLab pricing page.
You can do all these docs-as-code tutorials with a free GitHub or GitLab account. I recommend using SSH keys rather than entering your password for each git command that requires authentication.
- Read about Connecting to GitHub with SSH in the GitHub user documentation.
- Get more information about GitLab and SSH keys in the GitLab user documentation.
Learn basic Terminal and Git Bash commands
One great aspect of these developer workflows and tools means you have a lot of freedom to choose how you work. That said, for this choose-your-adventure series, we tend to think you already have Terminal commands memorized or you understand them. Whether you’re on a Mac, Linux, or Windows, these come in handy.
Knowing the basics should help. Here’s a short list:
ls- List directory contents,diris the equivalent in Windows.pwd- Show working directory name,cd ,is the equivalent command in Windows.cd path/to/directory/- Change to another directory. In Git Bash on Windows you can usecd /c/project/. If you need to change to a directory with spaces in the name, you must surround the path with double quote marks, such ascd "C:\My Project\".cd ..- Go up one directory.git status- Shows the changes pending or shows if changes are already committed.git branch- Lists all the local branches and indicates the current branch with an asterisk (*).git config -l- Lists all the configuration for the local repo when it contains a Git repository.git init- Sets up all the files for Git to be able to track a project as a repository. Init stands for initialize.
More resources for learning Git and GitHub
As with any complex system, you want to practice using Git commands to learn the system well and also how to troubleshoot. Here’s a great list of resources for both hands-on practice and reference.
- GitHub Learning Lab “Get the skills you need without leaving GitHub. GitHub Learning Lab takes you through a series of fun and practical projects, sharing helpful feedback along the way.”
- GitHub Guides - Guided tutorials about 3-10 minutes in duration.
- Git and GitHub learning resources
- Five basic Git commands every beginner needs to know
- Troubleshooting connectivity problems
Learn GitHub vocabulary
The terms sound confusing at first. Here’s a list of vocabulary words to help you get through the initial learning curve.
| Term | Definition |
|---|---|
| branch | A parallel version of a repo within the repo that does not affect the primary or main branch. You can work freely in a branch without affecting the live version. After you make changes, you can merge your branch into the main branch to publish your changes. |
| clone | A copy of a repo that lives on your computer instead of on a website’s server. |
| commit | A point-in-time snapshot of a repo. Commits let you see the differences between changes. A commit is an individual change to a file or set of files. Every time that you save a file or a set of files, Git creates a unique ID, also known as the SHA or hash, that tracks the changes. Commits usually contain a commit message, which is a brief description of what changes were made. |
| downstream | A label for a remote URL, where a remote represents a place where code is stored. A downstream remote indicates an opposite of an upstream, or original, repo. |
| fork (noun) | A copy of the repo that is entirely yours in your namespace. A fork gives you a way to both contribute openly and get credit for your contributions. |
| fork (verb) | The act of making a forked copy of the repo. |
| issue | A way to submit a suggested improvement, defect, task, or feature request to a repo. In a public repo, anyone can create an issue. Each issue contains its own discussion forum. You can label an issue and assign it to a user. |
| organization | A collection of group-owned repositories. |
| pull request | A method of submitting edits that compares your changes with the original. Teams can view the comparison to decide whether they want to accept the changes. |
| push | Move your local committed changes to a remote location, such as GitHub.com, so that other people can access them. |
| remote | A version of your project that is hosted on the Internet or on a network. The remote is usually connected to local clones so that you can sync changes. |
| repository or repo | A collection of stored code or docs. |
| review | Perform a line-by-line comparison of a change and comment on improvements or suggest changes, much like a copy editor does for a newspaper article. |
| upstream | The primary label for the remote URL indicating the original repo where changes are merged. The branch, or fork, where you do your work is called downstream. |
You want to get a good sense of these terms, because when you’re new to Git, it’s easy to confuse named directories, such as a cloned fork that is named after the original repo, and Git branches.
You can instruct Git to base your branch on the main branch in upstream, origin, or another named remote. For example, this command bases a new branch on the main branch in the upstream remote:
$ git checkout upstream/main -b my-branch
Set up prompts (Terminal on MacOS or Linux)
While you’re working in your Terminal window, it’s great to always know which branch you’re on by modifying your prompt to show the current git branch. To do so, put this snippet of code in your ~/.bash_profile file:
# Git branch in prompt.
parse_git_branch() {
    git branch 2> /dev/null | sed -e '/^[^*]/d' -e 's/* \(.*\)/ (\1)/'
}
#export PS1="$ "
export PS1="\u\ \W\[\033[32m\]\$(parse_git_branch)\[\033[00m\] $ "
As an example, with this code in my ~/.bash_profile file, my prompt looks like this while I’m working in a branch named initial-content:
agentle\ choose-adventure-workshop (initial-content) $
Set up prompts (Git Bash on Windows)
Git Bash on Windows displays your current branch on the prompt for you.
One concept to remember here is that Git Bash uses Linux-like commands but the directory listings use forward slash (/) instead of back slash (\). You can change directories with commands like cd /c/project/ where /c/ represents your C:/ drive on Windows.
Set up your GitHub account for SSH access
To avoid entering your password every time you perform git clone or git push commands (it does get tedious), then set up an SSH key for your credentials on GitHub, and then always use the SSH reference rather than the HTTPS reference when you do a git clone command. You set up references with an SSH key as your identifier, and then you do not need to enter a password from the command line to authenticate to the GitHub site. The GitHub instructions for Connecting to GitHub with SSH work great for this setup, and I highly recommend it. The GitLab instructions in GitLab and SSH keys also have a complete walkthrough.
Clone an existing repository on GitHub
This section goes through the workflow and tips for working with an existing GitHub repository. Let’s say you join a new team and they use GitHub for their documentation. Where do you start? This article should give you guidance, tips, and scenarios.
Let’s say it is a stand-alone repository only for docs. In other situations, perhaps the repository has a /docs subdirectory. You can use these instructions in that situation as well.
Prerequisite: make sure that you have access to the repository
If you go to the URL given to you in a browser and get a 404 page, it’s possible you’re not already logged into GitHub. Log in and visit the link again.
If you get a 404 page after logging in, then you need to be added as a collaborator to the repository. Ask an admin for the repo or organization to add you as a collaborator so you can access the repository.
Get a copy of an existing Git repository
-
Open a web browser and go to the URL for an existing Git repository. For example:
- GitHub: https://github.com/justwriteclick/probable-winner
- GitLab: https://gitlab.com/gitlab-com/www-gitlab-com
-
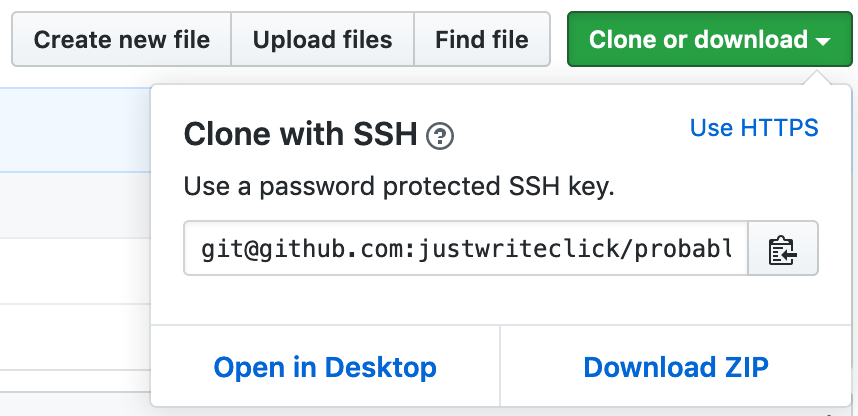
Click the button with a “Clone” label. Examples:
GitHub
GitLab
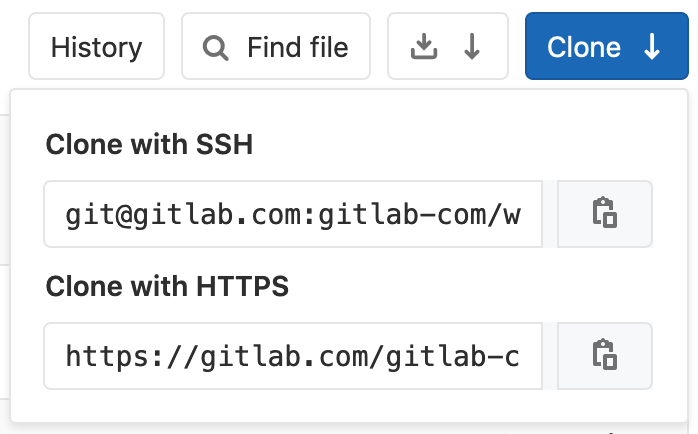
- Choose the HTTPS option if you have not set up an SSH key. Choose the SSH option if you have set up an SSH key.
Copy the reference to use in the
git clonecommand. Examples:- GitHub: HTTPS: https://github.com/justwriteclick/probable-winner.git SSH: git@github.com:justwriteclick/probable-winner.git
- GitLab: HTTPS: https://gitlab.com/gitlab-com/www-gitlab-com.git SSH: git@gitlab.com:gitlab-com/www-gitlab-com.git
- Open a Terminal window.
- Change directories to the place where you want to store repositories, such as
~/src.$ cd ~/src/ - Clone the repository. For this example, you can clone the GitLab source for the about.gitlab.com site. This one takes a while to download but you get a percentage progress reported on the command line:
$ git clone https://gitlab.com/gitlab-com/www-gitlab-com.gitNote: You are prompted for a password if the repository is private. Both of the examples above are public repositories.
- To view the files, change directories:
$ cd www-gitlab-com/ - List what is in the directory to see the contents:
$ ls - Show which branch you’re on:
$ git branchOutput:
* main
Now you have a local copy of the content and can do more steps in Working with content in GitHub repositories. Hopefully you have a good starting point for working with docs repositories.
Create a new repository on GitHub
Before you get too far writing content for a new site, get the directory set up for version control in a Git repo, and make some incremental commits.
- Go to https://github.com and log in.
- In your browser, create a new repository in your user space or organization.
- In the root directory, create a quick
READMEfile that contains only a header. For example:$ echo "# do-docs-as-code" >> README - Set up your local Git installation so that it uses
mainfor the default branch name every time you use thegit initcommand.git config --global init.defaultBranch main - In the root directory, initialize the Git repo.
$ git init - Next, add all the files you want to have in the repo, as indicated with the period
..$ git add . - Create a commit, or a point in time for the state of the current files in the directory.
$ git commit -a -m "Adds initial docs-as-code project" - In a browser window, go to the newly create repository and copy the SSH or HTTPS reference for the repo, such as:
git@github.com:annegentle/do-docs-as-code.git. - In the Terminal window, type git commands to add a “remote” named “origin” and then paste in the SSH or HTTPS reference, such as
git@github.com:annegentle/do-docs-as-code.git.$ git remote add origin <paste the reference> - In the Terminal window, set the newly added remote as the upstream “tracker” (named origin) and push the initial commit to this new branch named
main.$ git push --set-upstream origin main
Ignoring operating system files or generated files
In GitHub repos, you can place a .gitignore file that contains the file extensions or folder names that you want to keep out of source control. When a file extension or folder is in the .gitignore file, even when you use the git add . command, those files and folders are not added to the commit.
This exclusion is useful so that you do not have a lot of difficult merges on output HTML files or operating system tracking files.
For Sphinx, you want to ignore these files and folders to avoid merge conflicts:
build
.DS_Store
For Jekyll, you want to ignore these files and folders:
_site
.DS_Store
For Hugo, you want to ignore these files and folders. The static folder could be named public, depending on your configuration.
static
public # depends on the configuration
.DS_Store
Additional resources
Learning Git and GitHub resources on docs.github.com Pro Git